Last year, Eric brought home a wedding favor from a coworkers wedding for me to sample. It was a cupcake on a lollipop stick and coated with chocolate.
Is this real life?
But it wasn’t a fluke my friends. A couple months later at a sales meeting, we had cake pops for dessert and they were even fancier! They were multiple flavors of cake pops dunked in gourmet chocolate and drizzled with white chocolate.
And THEN I had these crazy cake pops that tasted like heaven, made me instantly drop five pounds and poop rainbows.
Ok, that might be a slight exaggeration. Slight.
What really happened next is that Starbucks started selling the crap out of those little suckers and now they are a complete obsession of many of my friends.
So of course we had to make them for the bridal shower. Actually, I made Maggie do the manual labor while I watched, offered suggestions and snapped photos.
Beware; your hand will probably look like this if you make these at home.

Don’t worry, it will come off after 42 hand washes.
You will need…
1 boxed cake mix + whatever the boxed mix requires (usually some eggs and vegetable oil)
2 packs of your favorite kind of chocolate morsels (dark, milk, semi sweet)
1 pack of lollipop sticks
Start by preheating your oven to the baking instructions on your mix box. You could also bake the cake from scratch, but this is enough work as it is.

Follow the instructions on the box to mix the batter, and then follow baking instructions.
When the cake is finished, let it completely cool.

Using a large spoon, scoop out a section of the cake large enough to fill your hands when they are cupped together. Wet the palms of your hands and roll the cake crumbs into a ball and set on a plate.
Repeat this until all of the cake is used.
Pop the cake balls into the freezer for an hour.
When the balls have frozen, it’s time to stick em’! Pull them out of the freezer and pour a cup of warm water. Dip the tip of the lollipop stick into the warm water and then slide it into the top of the ball about ¾ of an inch in.

When all the balls become pops, stick them back in the freezer for 30 minutes.
While the pops are back in the freezer, it’s time to melt the chocolate. You need to create a double boiler by putting a small metal bowl inside of a large pot filled with water. Place the chocolate morsels into the small bowl and then turn the heat under the pot on to medium.

This slow melting of the chocolate will ensure the chocolate does not burn and that it will stay smooth.
I learned this lesson the hard way. There are no short cuts on this one.
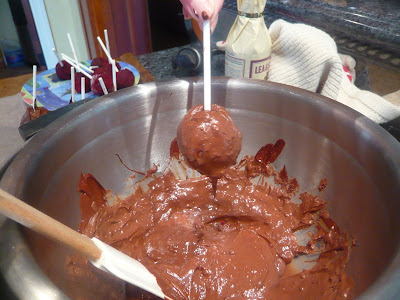
When the chocolate is melted and ready, remove the pops from the freezer. One by one, hold the pops over the bowl of chocolate and gently spoon (with a large spoon) the chocolate over the cake part of the pop.

Place the finished pops on wax paper to let them cool. As soon as the chocolate has hardened completely, the pops are ready!

Sorry Starbucks!
Love and Beer Floats
Angela

No comments:
Post a Comment